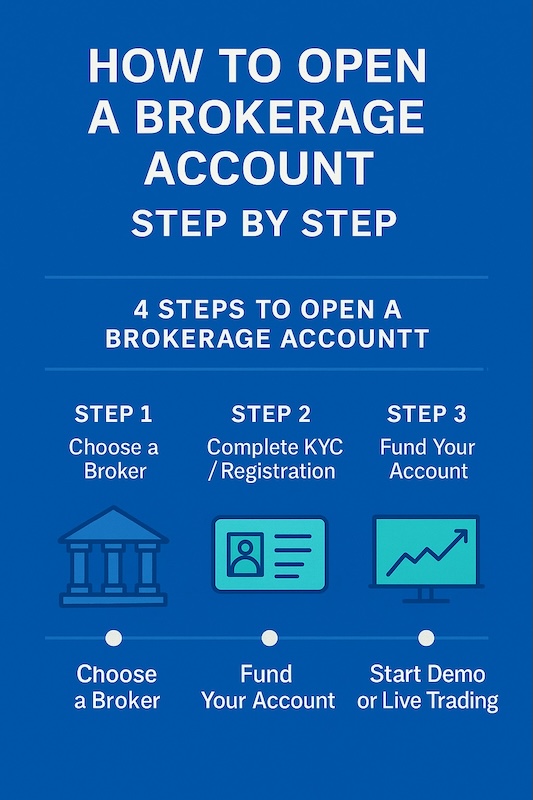
Opening a brokerage account is the gateway to buying stocks, ETFs, bonds, forex, commodities, and even crypto with regulated brokers. If you’ve never done it before, the process can feel intimidating. This brokerage account guide walks you through everything from choosing a broker to placing your first trade—without jargon, and with practical tips to avoid common mistakes. By the end, you’ll know exactly how to open a brokerage account and start a trading account the right way.
- What Is a Brokerage Account?
- Step 1 – Choose a Broker
- A. Define your goal first
- B. Safety & regulation
- C. Costs to compare (small print matters)
- D. Platform & tools
- E. Funding & access
- F. Red flags
- Quick checklist to decide
- Step 2 – Complete KYC / Registration
- What brokers typically ask for
- Account choices during KYC
- Tips to pass KYC faster
- Security best practices
- Step 3 – Fund Your Account
- Step 4 – Start Demo or Live Trading
- A. Set up your workspace
- B. Build a simple plan (and write it down)
- C. Place your first (small) trade
- D. Prefer investing? Automate it
- E. Mind the rules & taxes
- Key Takeaways
- FAQ
- Do I need ID to open a trading account?
- Can I open multiple brokerage accounts?
- How much money do I need to start?
- Which is better for beginners: cash or margin?
- How long does approval take?
What Is a Brokerage Account?
A brokerage account is an account you open with a licensed broker to buy and sell financial assets. You deposit money, then use the broker’s platform to place orders (market, limit, stop) on exchanges or over-the-counter markets.
What you can access depends on the broker:
- Equities & ETFs (stocks, index funds, sector funds)
- Bonds & fixed income (government, corporate, municipal)
- Derivatives (options, futures—permissions required)
- Forex & CFDs (in some jurisdictions)
- Commodities (via futures, CFDs, or commodity ETFs)
- Crypto (spot or crypto ETPs/ETFs where allowed)
Common account types
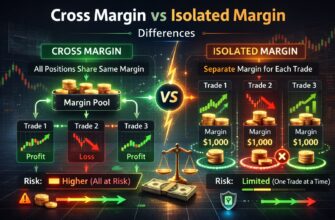
- Cash account: you trade with settled cash only; simple and safer for beginners.
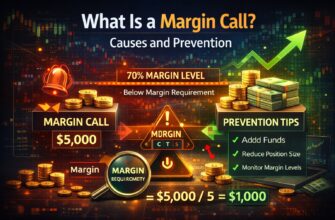
- Margin account: the broker can lend you money (leverage) to trade; comes with interest, rules, and risk of margin calls.
- Tax-advantaged or retirement accounts (where available): long-term investing with specific contribution/withdrawal rules.
- Individual / joint / corporate registrations depending on your situation.
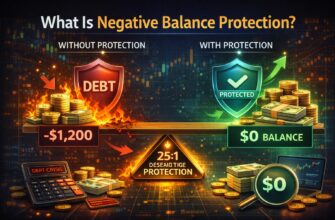
Protections & policies vary by country (e.g., investor-compensation schemes, segregation of client funds). Always check your broker’s license, regulator, and customer-asset protection disclosures.
Step 1 – Choose a Broker
Choosing a broker is more than picking a nice-looking app. Your decision affects costs, product access, and safety.
A. Define your goal first
- Long-term investing? Prioritize low fees, reliable custody, dividend handling, fractionals, and automatic reinvestment.
- Active trading? Look for fast execution, advanced order types, depth-of-book data, robust charts, and API support.
- Specific markets? Ensure the broker offers your target assets (e.g., options on EU equities, Asian markets access, spot FX, futures, or crypto).
B. Safety & regulation
- Verify the legal entity you’ll contract with and the regulator overseeing it.
- Read the client-asset segregation policy and investor-protection scheme.
- Check how your data and funds are held (custodian, omnibus vs. segregated accounts).
C. Costs to compare (small print matters)
- Commissions & spreads (equities, options per-contract fees, futures per-side fees).
- Financing/margin interest and short borrow fees.
- FX conversion (when trading assets in other currencies).
- Market data subscriptions (Level 1/Level 2), optional but relevant to active traders.
- Non-trading fees: deposit/withdrawal, inactivity, account closing or transfer fees. Tip: A broker with zero commissions may earn via payment for order flow, wider spreads, or FX markups. Compare all-in costs for your use case.
D. Platform & tools
- Stability and speed: Mobile + desktop/web, order-entry reliability during volatile sessions.
- Order types: stop-loss, stop-limit, trailing stop, OCO/bracket orders.
- Research: screeners, earnings calendars, fundamental data, news feeds.
- Education & paper trading: built-in tutorials, demo accounts, practice mode.
- Support: response time, live chat/phone, local language availability.
E. Funding & access
- Accepted deposit methods (bank transfer/ACH/SEPA/SWIFT, cards, local rails), processing times, and withdrawal rules.
- Base currency options to minimize conversion costs.
- Country/residency acceptance and tax form handling.
F. Red flags
- Unclear licensing, guaranteed returns, aggressive bonuses that lock funds, high-pressure sales, or complicated withdrawal conditions. If something feels off, pick another broker.
Quick checklist to decide
- Licensed & transparent? 2) Products I need? 3) All-in fees acceptable? 4) Platform stable with the order types I’ll use? 5) Easy funding/withdrawal? 6) Helpful support?
Step 2 – Complete KYC / Registration
Once you’ve picked a broker, you’ll complete KYC (Know Your Customer) and account setup. Expect a 10–30 minute process, plus review time.
What brokers typically ask for
- Personal details: full name, date of birth, nationality, tax residence.
- Contact info: email, phone, residential address.
- ID verification: passport or national ID; sometimes a selfie/biometric check.
- Proof of address: utility bill or bank statement (recent).
- Employment & source of funds: occupation, employer, income range (anti-money-laundering compliance).
- Financial profile & risk tolerance: experience with products (stocks, options, futures, FX), objectives (growth, income, speculation).
- Tax forms as required in your jurisdiction (e.g., local equivalents; non-resident declarations where relevant).
Account choices during KYC
- Cash vs margin (you can often upgrade later).
- Options/futures permissions (usually tiers based on your answers).
- Base currency (to minimize FX fees).
- Dividend handling (automatic reinvestment where available).
Tips to pass KYC faster
- Ensure your ID is valid and matches your personal details exactly.
- Upload high-quality scans/photos without glare.
- Use your current residential address (PO boxes often rejected).
- Complete all suitability questionnaires honestly—brokers may restrict risky products if your answers indicate limited experience.
Security best practices
- Enable 2-factor authentication (2FA) immediately.
- Use a unique, strong password and store recovery codes securely.
- Beware of phishing: the broker will never ask for your password or full card details over chat or email.
Step 3 – Fund Your Account
With approval granted, you can fund your brokerage account.
Deposit methods & timing
- Bank transfer (ACH/SEPA/SWIFT): usually lowest cost; times vary from same-day to a few business days.
- Card payments: instant but may carry higher fees and sometimes cash-advance treatment by your bank.
- Local rails & e-wallets: convenient in some countries; check limits and fees.
- Third-party/crypto funding: only where allowed; understand conversion and compliance implications.
Know your limits and holds
- Brokers can place deposit holds (funds visible but not yet withdrawable).
- Some assets require settled cash; settlement windows depend on market rules.
- First withdrawal may require bank-account verification (a small test transfer or documents).
Minimize hidden costs
- Choose a base currency matching most of your trades to avoid repeated FX fees.
- Compare FX conversion rates; some brokers add a markup.
- If using margin, understand daily interest accrual and how it’s calculated.
Risk management mindset
- Deposit only what you can afford to risk. Keep an emergency fund outside the account.
- Start small; scale up as you build a track record.
Step 4 – Start Demo or Live Trading
You’re funded. Now decide whether to begin with paper trading (demo) or go live. For most newcomers, a short period of paper trading is smart: you learn the platform and test your plan without monetary risk.
A. Set up your workspace
- Platform tour: watchlists, chart windows, order ticket, positions, P&L, notifications.
- Market data: add your primary exchange(s); decide whether you need Level 2 depth.
- Hotkeys & templates: pre-configure order sizes, stop-loss distances, and bracket orders to avoid manual errors.
B. Build a simple plan (and write it down)
Whether trading actively or investing long-term, document:
- Universe: what assets will you trade/invest in (e.g., liquid large-cap stocks, major FX pairs, broad-market ETFs)?
- Entry rules: the signals you use (fundamental catalysts, moving-average cross, breakouts, support/resistance).
- Exit rules: profit targets, trailing stops, time stops.
- Risk per trade: a common beginner rule is risking 0.5–1% of account equity per trade.
- Daily loss cap: e.g., stop trading for the day if you hit −2% to avoid emotional decisions.
- Position sizing: base size on the distance to your stop (e.g., position = risk per trade ÷ stop size).
C. Place your first (small) trade
- Use a limit order to control entry price.
- Attach a stop-loss immediately.
- If the platform supports it, use OCO/bracket orders so your stop and target are placed together.
- Log the trade (entry, rationale, emotions) in a journal. Review weekly.
D. Prefer investing? Automate it
- Set up recurring deposits and DCA (dollar-cost averaging) into diversified ETFs or index funds.
- Turn on dividend reinvestment where available.
- Schedule a quarterly portfolio review to rebalance.
E. Mind the rules & taxes
- Understand your local day-trading, margin, and short-selling rules.
- Keep records for tax reporting (your broker will provide annual statements; maintain your own logs for accuracy).
- If you trade derivatives, learn how assignment/expiration works before using them.
Key Takeaways
- A brokerage account lets you buy and sell financial assets through a licensed intermediary.
- Choosing the right broker is about safety, product access, true all-in costs, platform reliability, and funding/withdrawal convenience.
- KYC requires valid ID, proof of address, and a financial profile; answer honestly to get appropriate permissions.
- Funding has fees and timing—opt for methods and base currency that minimize FX and transfer costs.
- Start with paper trading to learn the platform and test your plan. If investing, automate DCA and reinvest dividends.
- Protect yourself with 2FA, strong passwords, risk limits, and a trade journal. Consistency beats size at the beginning.
FAQ
Do I need ID to open a trading account?
Yes. Brokers are legally required to verify your identity and address (KYC/AML). You’ll typically submit a passport or national ID and a recent proof of address. Some brokers also request a selfie or video check.
Can I open multiple brokerage accounts?
Yes. Many investors maintain more than one account—for example, one for long-term investing and another for active trading, or separate accounts in different base currencies. Keep track of fees, tax documents, and transfer rules.
How much money do I need to start?
You can start small. Some brokers have no minimum deposit and offer fractional shares. The right amount depends on your strategy and risk tolerance—fund only what you can afford to risk.
Which is better for beginners: cash or margin?
A cash account is simpler and safer for learning, since you’re not borrowing money and won’t face margin calls. Consider margin later, after you understand position sizing and risk.
How long does approval take?
If your documents are clear, approvals can be same-day; if additional checks are needed, it may take a few business days. You’ll be notified once the account is ready to fund.
See also: Tradium trading guides and glossary.